
KT tape for knees is also known as Kinesio taping. It is a therapeutic tool that is being used by many rehabilitation specialists in their rehabilitation programs. Kinesio tape was developed by Dr.Kenzo Kase, he was a Japanese chiropractor who wanted to create a tape that would copy the elasticity of human skin and provide support but wouldn’t limit the athlete’s movement as traditional tapes do.
While watching some sport we have watched our favorite athlete being covered with colorful stripes around the knee, back, or shoulder. That’s Kinesio tape or KT for short, when applied strategically Kinesio tape can provide support, reduce swelling, and lessen the pain. All this reduction will help athletes to improve their performance. Kinesio tape is usually used on areas such as the back, calves, hamstring, knee, shoulder, and wrist.
What is the material used to make Kinesio tape?
Kinesio tape either contains 100% cotton and elastic fiber or a blend of polyester and cotton is used along with elastic fiber. When using Kinesio taping on sensitive skin where higher tension is needed to achieve the desired outcome the latter material is used.
The tape is applied to a paper backing with the help of acrylic adhesive offering 10 to 15% stretch. Kinesio tape can stretch up to 120 to 140 % of its original length.
Hypoallergenic dyes are used in the making of Kinesio tape that makes the tape safe for most of the users it is also latex-free. After applying, Kinesio tape can stay in the same place for up to 2 to 3 days even after showing and exercising. To see the positive result of the Kinesio tape you have to wait at least for 2 hours.
How does Kinesio tape work?
The working of Kinesio tape is based upon providing a free supply of blood and other fluids around and through the injured area while using science to provide maintaining support to the body. Kt tape works by stabilizing the injured area by lightly adhering to the skin and applying pressure on the tissues where tape Kinesio tape is wrapped around.
Kinesio tape allows the connecting tendons and tissues surrounding the affected muscles to move along freely with the body. It improves the blood flow circulation around and through the injured muscles and also flow of lymphatic fluid is increased that cleanse and healing the inflammation without the use of medication or surgery.
In short, Kinesio tape help improve blood circulation, helps in healing internal injury, provides support to the muscles, and helps prevent further injury while still providing the ability to move an injured muscle.
Benefits of Kinesio tape
- Decrease in inflammation – Kinesio tape will help our body remove congestion while also providing the injured muscle with improved blood circulation and lymphatic fluid. Improved blood circulation helps flush out damaged tissues in turn reducing inflammation and chemical blockage.
- Muscle support – Sometimes injured muscles can get in our way of proper posture to supporting those muscles with Kinesio tape will help us improve posture. When Kinesio tape is properly applied it enables our injured muscles to function properly and reduces muscle pain and fatigue. It also provides protection against over-contraction or over-extension.
- Improved performance – When providing support to injured muscles through taping can improve your athletic performance because unlike other assistive devices that make you rely on them for support and stability making you dependent but Kinesio tape trains our body to become independent and efficient.
How to KT tape knee?
Kt tape for knee is often done with the goal of providing improved knee stability. It will help you maximize the output from your knee and minimize the pain. Kt taping a knee should be done carefully because if it is too tight you will be at risk of cutting off your blood circulation and if it’s not enough it won’t be able to provide the necessary support required.
Note – The technique that is mentioned below should be used to treat issues like overuse injury, general knee pain, Patella Femoral Pain, and Patellar Tendinopathy.
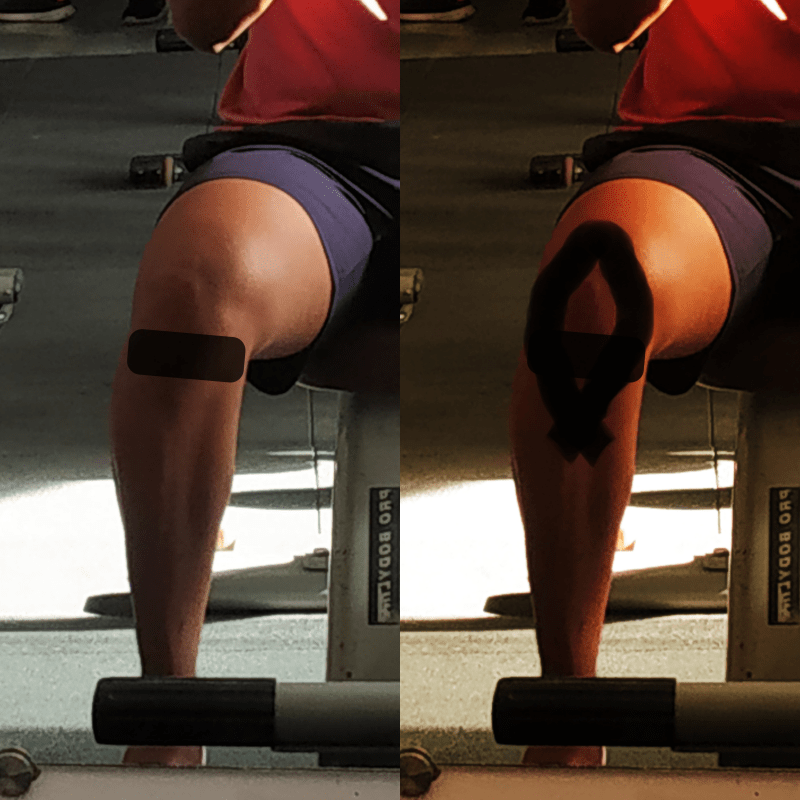
Technique 1
- Start by measuring the bump under your knee (tibial tubercle) all the way to your quadriceps tendons. Now cut two strips of equal lengths. Start rounding the end of the strips to get maximum peeling.
- Sit on an elevated surface such as a bench or bed. Now bend your knee and peel off the first strip and securely put it on the outside of the tibial tubercle without stretch.
- Stretch the tape up to 40%, now wrap the tape around your inner knee by following its natural curve, and secure the end without the stretch. Gently rub onto the tape to activate the adhesive in the tape.
- Now repeat this same process with the second strip along with the outer knee, cross the ends to form an ‘X’.
- Now cut the strip of the tape and make sure that it’s long enough to be wrapped under your kneecap. Straighten your knee slightly.
- Now peel the tape from the center and stretch up to 80% and apply under your kneecap.
- Wrap the tape along your hamstring and now secure the ends.
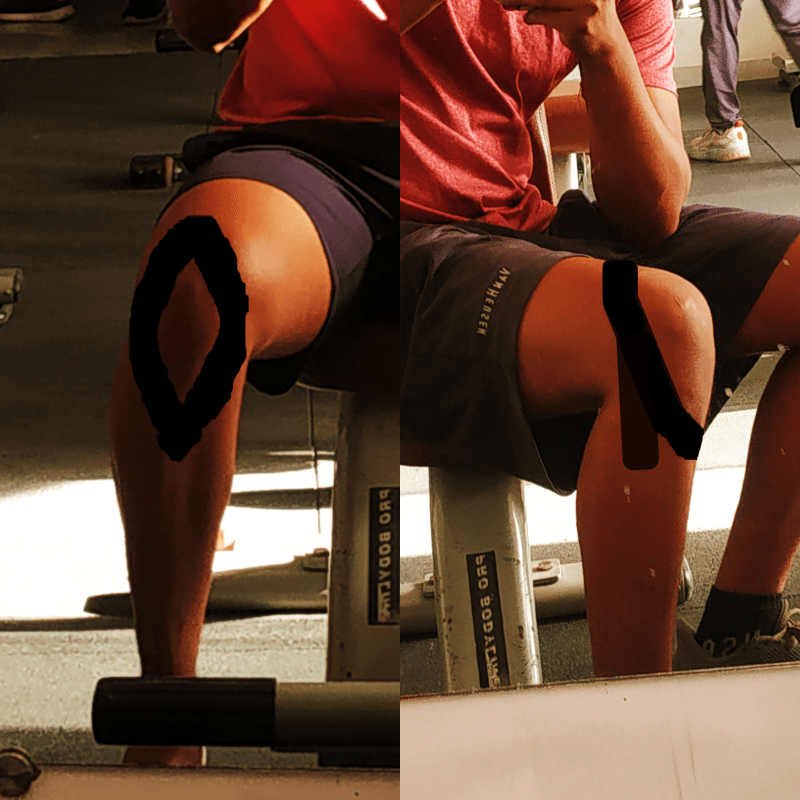
Technique 2
- Sit on an elevated surface with your knees being bent at a 90-degree angle. Make sure to maintain this position when taping.
- Now cut the strip of Kinesio tape that’s about 3 inches long and cut two more strips that are 5 inches long.
- First, take the 3-inch strip, and apply about 70 percent of tension on either side of the tape. Apply the center of the tape directly onto the patellar tendon. Now release the tension on the tape and lay down any end of the tape along the side of the knee.
- Now locate the midlength down on the front thigh and now locate the tuberosity of the tibia (bump below your knee cap). Now two more strips of 5 inches will start at the center midlength down the front thigh and end at the bump below the knee cap.
- Apply one of the 5-inch strips with 25 percent tension on the center of the thigh and let the first half of the tape lay on the lateral lower half of the thigh and as you approach the knee apply 50 percent of tension along the second half of the tape as you wrap it around the knee cap.
- Now you don’t have to apply any pressure at the end of the tape as it laydowns on the tuberosity of the tibia.
- Repeat the same procedure for the other side of the thigh and knee. Now using the backing paper on the tape rub the Kinesio tape and activate the glue on the tape with the help of heat.
Techniques 1 & 2 are for general knee pain, Patella Femoral Pain, and Patellar Tendinopathy.
Technique no.3 of Kt tape for knee is for medial collateral ligament (MCL) injury and lateral collateral ligament (LCL) injury.
Technique 3
- Sit on an elevated surface with your knees bent at a 90-degree angle also make sure to keep this same position during the taping procedure.
- Now cut 4 strips of Kinesio tape that are about 4-inches long.
- Now start by applying one end of the Kinesio tape with no pressure along the tuberosity of the tibia (Bump below your knee cap). Now apply 50% of pressure as you wrap the tape around the lateral side of the knee cap and up to the center of the front thigh.
- Repeat the same procedure for the other side of the knee.
- Now place one end of the Kinesio tape along the lateral side of your lower leg. Now apply 50% pressure as you apply the tape along the lateral side of the knee. Make sure to apply no pressure as you lay down the end of the tape on the lateral side of the thigh.
- This strip will help provide support and stability for lateral collateral ligament (LCL) injury. Repeat the same technique on the medial side of the knee to provide support and stability for medial collateral ligament (MCL) injury.
- Now by using the backing paper of the tape rub the Kinesio tape and activate the glue on the tape with the help of heat.
How to remove Kinesio tape?
Removing Kt tape for knee can be tough sometimes, below suggestions can help your remove the kt tape for knee easily.
The first step would be applying baby oil as it can help lose up the adhesive. After applying baby oil wait for at least 10 to 15 minutes and then start slowing because removing tape too fast can be rough and painful on your skin. If pulling is painful for you you can roll back the tape and also move in the direction that your hair grows that won’t damage your hair follicles.
Final words
Kt tape for knee will help you provide support and stability and it will also help you improve your athletic ability without limiting your range of motion. It will get rid of discomfort and aid in speedy recovery. Unlike other tapes, Kt for knee won’t restrict or interrupt your blood circulation.
Other than this 3 Kt tape for knee techniques, there are different techniques to tape your knee so it would be best for you to consult with a professional as they will help you use the best technique according to your body and provide you with the best relief.